ABIT’s AA8-DuraMAX — The Next Winner or Loser?
The BIOS:
As usual ABIT has stuck with the Phoenix AwardBIOS for the AA8 DuraMAX board. The navigation of the BIOS is easy and if anyone has used an ABIT board over the past few years they will feel at home when tweaking setting in this BIOS. Since the BIOS only has a few changes and most of our readers know ABIT products we will save time and quickly cover the BIOS features.
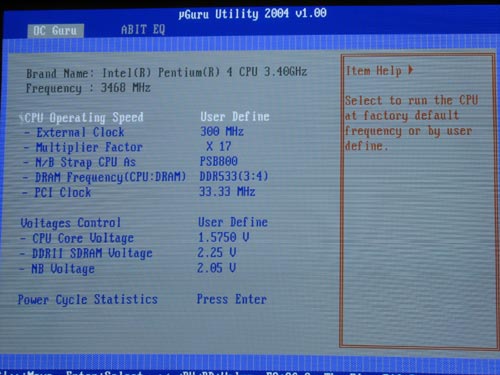
The above image is the screen that most Enthusiasts will go to first, the OC Guru menu inside the uGuru Utility. This is “where the magic” happens for overclockers. Here you will be able to adjust the External Clock (FSB) and the ever-so-crucial dividers for stable performance settings. This is also the screen where you can adjust your voltages on. The CPU Core can go up to 1.9250V, DDR2 Voltage can hit 2.25V, and the North Bridge Voltage peaks out at 2.05V. Once you have all your settings made I highly advise you to go back to the main BIOS screen and hit F6. By hitting F6 you will be allowed to save up to five profiles, complete sets of BIOS options, to the CMOS. You have the ability to name the profile anything you wish and you can switch between profiles also by loading an optimized profile. This makes for a pretty slick interface and to be honest it is very simple to use. The BIOS has managed to advance by leaps and bounds in the past year alone thanks to companies pushing to raise the bar with features like this.
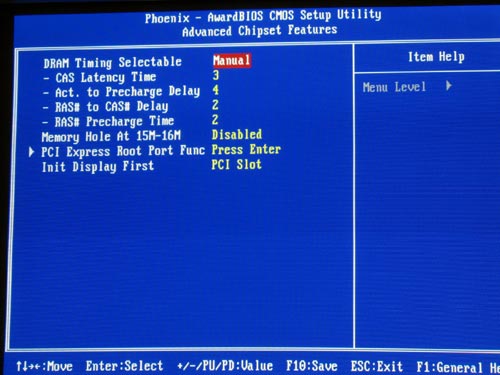
Here is a popular menu for our readers! This is the Advanced Chipset Features menu and it allows us to tinker with settings for memory timings, and as you can see, we are running timings of 3-4-2-2.
To be able to adjust your timings like we did you have to be sure the DRAM Timing Selectable setting is on Manual. Once on manual you have control of the memory timings. The CAS Latency Time can be set to 3, 4, or 5; the Active to Precharge Delay can be set from a low of 4 to a high of 15 in increments of 1; RAS to CAS Delay can be set from one of 2, 3, 4, or 5; and the RAS Precharge can be set to 2, 3, 4, or 5.
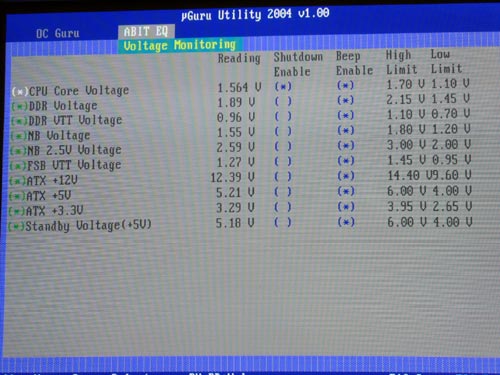
Many of you are concerned about your system’s health and like to monitor the voltages, fan speeds, and temperature readings in the BIOS. If you are one of these readers, the ABIT AA8-DuraMAX offers some of the best system monitoring features that I have seen in a board to date. It even allows users to specify thresholds that trigger alerts and unattended system shutdowns, in the event something goes wrong. While it gives the user many options and items to set, it is also very easy and simple to use. The interface for the monitoring is simple and straightforward, too.
The bios was easily manageable, and gave us no issues in trying to use it at all. Let’s move on to the bundle of the board.
The Bundle
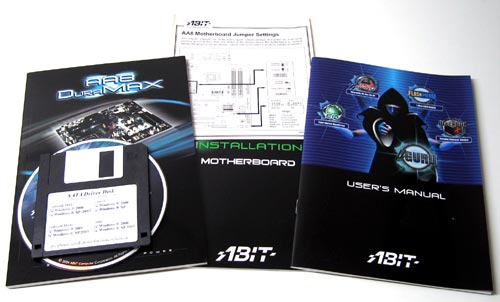
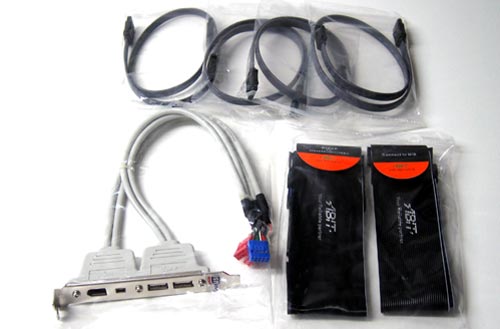
Once you open the main box you’ll find two smaller inner boxes that contain the bundle for the ABIT AA8-DuraMAXThe first box contains the manuals, driver CD, and the floppy disk with SATA RAID drivers. The driver CD also contains the uGuru utilities that will be needed to use uGuru from the desktop.
In the other box you will find one floppy ribbon, one ATA-133 ribbon, 4 SATA cables and the I/O shield containing two USB2.0 ports and a pair of FireWire400 ports. Thanks to the inclusion of the four SATA cables you won’t need to buy any cables if you plan on using all four of the headers.
Now that we have covered the features, layout, BIOS, and the bundle we can get to the testing and overclocking!
Comments are closed.