The DFI 875P-T — LGA 775 meets Intel’s 875 chipset
The System BIOS
The BIOS is the heart of every motherboard; here is where you can fine tune and tweak your board and installed components for every last ounce of performance. In my opinion there is a fine line between a great BIOS setup and one which overwhelms the user. Generally BIOS tweaks are left to those who know and understand the ramifications of changes made to various settings, but in this day of DIY systems, a BIOS also needs to be simple enough for the new enthusiast to understand and master.
Pheonix Award BIOS
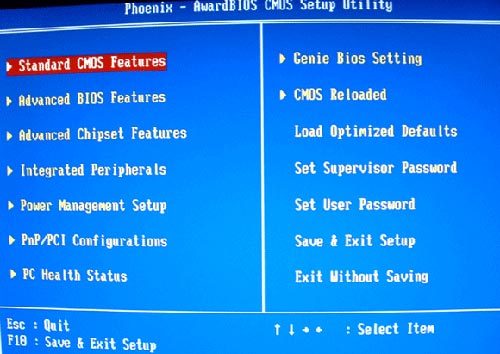
DFI chose the Pheonix Award BIOS to manage the 875P-T for a full featured, yet simple BIOS menu. Instead of going in depth into the basic menus that are standard on every board, I’ll focus on three important menu features of this board. The Advanced Chipset Features menu, The Genie BIOS menu, and The CMOS Reloaded menu.
The Genie BIOS menu
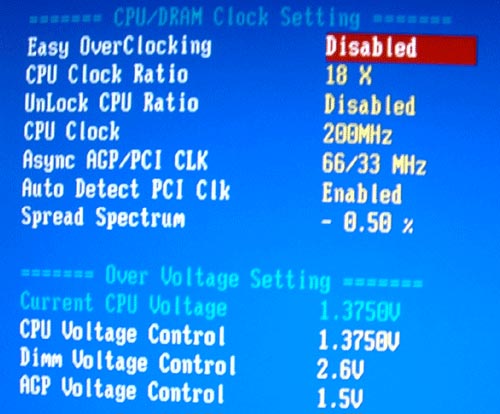
The Genie BIOS screen is probably the first screen overclockers will visit. Here you will find all the settings which affect the CPU and voltages, the lifeline of your board and system as a whole. First, you will notice a feature that is becoming fairly standard on motherboards — an automatic overclock feature. DFI calls theirs EASY OVERCLOCK. This bsically allows the user an easy way to overclock their system without the hassles of making small adjustments over a wide range of settings. Simply choose from a range of preselected overclock percentages (In this case DFI offers from 2.5% up to 15%), and the BIOS automatically adjusts the setting for you based on the installed components. This feature is great in theory, but on more than one occassion I’ve had systems refuse to boot or freeze up on me while using this type of program. I was able to use the full range of EASY OVERCLOCK offered in the BIOS without incident when my processor was set to a multiplier of 14 (2.8GHz), but at a multiplier of 18 (3.6) the highest easy overclock setting that would even boot was 10%, and that was after boosting the v-core from 1.40v to 1.55v.
Moving on, the FSB can be adjusted from 100 up to 400, with 200 being default. The CPU multiplier is displayed next, which matters very little unless you are one of the lucky few with a engineering sample CPU (all Intel processors are multiplier locked). Next are the voltage adjustments for your CPU, DIMM, and AGP; you will notice right awat that this board is meant for the enthusiast as the v-core ranges from 0.8375v all the way up to 1.975v! Next, you will see that the DIMM voltage ranges from 2.5v all the way up to 3.2v! The AGP voltage ranges from 1.5v to 1.8v, though I doubt too many people mess with this. The problem with overclocking most boards usually ends up being either the lack of or unstable voltage setting selections. From looking at the selection of voltages on the 875P-T, this shouldn’t be an issue.
The Advanced Chipset Features menu
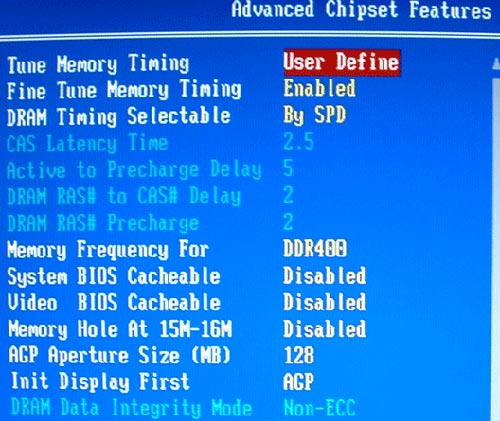
The Advanced Chipset Features menu is where users will adjust settings pertaining to the system memory. A couple of features worth pointing out here are the Tune Memory Timing feature and the Fine Tune Memory Timing feature. Within the Tune Memory Timing menu you can select User Defined, Fast, or Turbo.
Tune Memory Timing menu
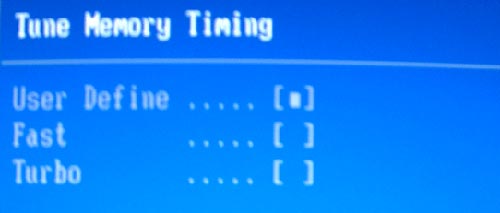
The Fast setting tightens the memory timings automatically, the Turbo setting tightens them even further. A couple of important points here are not to use either setting on an overclocked system, as it will fail to boot, and if you choose to use the Turbo setting, scroll to the bottom of the page and enable the Soft Patch Mode feature, failing to do this will also result in your system failing to boot. Again, unless you plan on running your system at stock speeds, do not enable Fast or Turbo memory settings! Next is the Fine Tune Memory Timing menu. Here, you select either Auto or Enable. Unless you are planning to run your system at stock speeds I recommend you leaving this set to Auto, selecting Enabled led to some system instablity while doing some testing during the overclocking portion of the review.
The last BIOS menu I’ll touch on is the CMOS RELOADED screen, DFI’s CMOS Reloaded is a nice feature in its own way. CMOS Reloaded basically allows a user to store multiple BIOS configurations and load them as needed with the use of a “hot key”. For the beginner it means recovering from an incorrect BIOS setting without clearing the CMOS, or being left with an unbootable system. If clearing the BIOS is required, CMOS Reloaded allows the user to simply load one of up to four stored BIOS configurations
The CMOS Reloaded menu
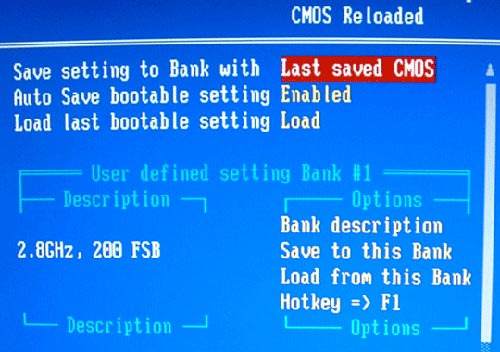
For the more advanced user, CMOS Reloaded allows you to store different BIOS configurations for different uses. Think a specific setting might be better for gaming? Simply store it and name it something like “Gaming.” Want to have the ultimate overclocking configuration? Simply save it as “O/C.” Do you do alot of system testing? Great! Simply name and save seperate configurations that can be loaded at start up. A fantastic feature that works exactly as it should.
All in all the DFI 875P-T’s BIOS is outstanding. I think the wide array of voltages settings for the v-core and DIMM alone make this a great BIOS, add in the ability to adjust just about every possible setting of your system, as well as the CMOS Reloaded feature, and this should be a dream board for the enthusiast crowd….but before we can say that, we need to check the most important aspect of this board: the performance.
Comments are closed.