Corsair Nautilus 500 Water Cooler Review
Installing the Nautilus 500
Intalling the Nautilus 500 varies in time and difficulty depending on which processor you are installing the system on. Corsair claims that the average user can install the system in just over eight minutes, but that is not the case. By the time one powers down their system, open the case, and installs the system you are looking at a 15 minute to a 30 minute job. Think about the steps that need to take place…
- Power Down the System
- Remove The Case Door
- Remove The Current Processor Heatsink
- Clean Thermal Compound Off the processor
- Install New Thermal Compound
- Remove PCI Slot Bracket
- Assemble the Nautilus 500 (Quick Connects & Clamps)
- Route Water Lines (Trim if Needed)
- Install New PCI Bracket With Lines Installed
- Mount The Water Block
- Fill The System With The Bottle Of Corsair COOL Coolant
- Top Off The System With Distilled Water (You need to buy this seperate)
- Plug in the Nautilus 500 (4-Pin Molex Connector and 2 fan headers)
- Power on the Computer
- Top Off With More Distilled Water
- Check For Leaks
- Replace Door
Since Corsair is aiming this unit at the mainstream consumer this will likely be their first time trying out water cooling their eight minute claim in their marketing material is off. For a mainstream consumer to complete the above 17 steps in just over 8 minutes is amusing to say the least. Even setting up our system on an open test bench took over 8 minutes as we took our time to make sure everything was installed correctly!
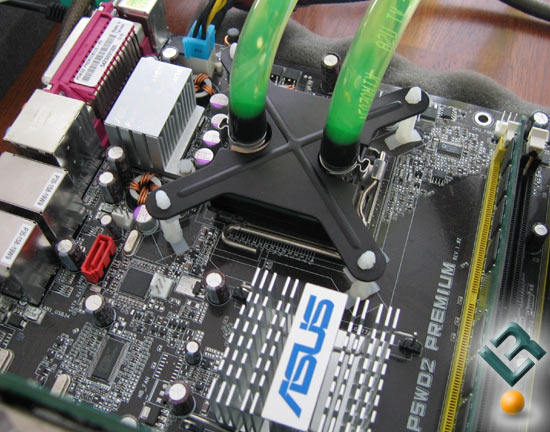
The Installed Intel LGA 775 (Socket T) Retention Bracket:
Installing the Intel Retention Bracket was easy once we figured out that the ends of the stand offs are two different sizes. The narrow (thin) side goes to the motherboard with the wider (thicker) side going to the supplied bracket. While installation was simple removing this bracket was a complete pain. We had to use needle nose pliers to compress the stand offs while lifting on the bracket to get it back off so we could install the kit on the AMD system.
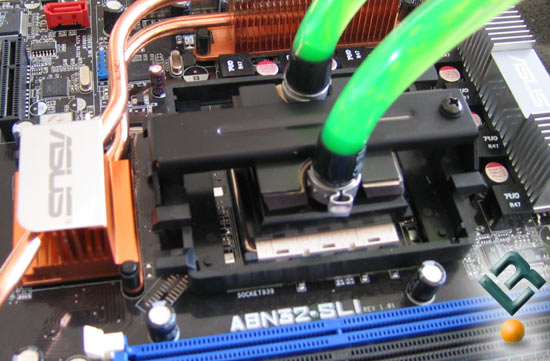
The Installed AMD Socket 754, 939, 940 Retention Bracket:
The AMD Retention Bracket is interesting to say the least. You get two brackets and a small philips head screw. You have to sit the water block in place and place the two backets over the block. Then you have to push down to compress the foam pad while making sure the screw hole lines up and is tight enough for the screw to grab threads. Keep in mind you have to have a screwdriver in your hand also to tighten the screw. Although it sounds a bit tricky it was actually easy once you figure out how it goes and took less than a minute to install. While the Intel bracket was hard to remove the AMD bracket was easily removed by taking the screw out.
Noise levels of the Nautilus 500 are not bad and believe it or not the pump was the loudest item in the kit. This is the same pump used in the Corsair COOL 12V@18W and is also the Apple OEM 2.5 GHz liquid cooling system pump The pump is known at the Delphi DC pump (DDC), which was co-developed and marketed in North America by Laing. Delphi rates the pump at 24~26 dBA at two feet away in a silent room.
Let’s take a look at some performance numbers!
Comments are closed.