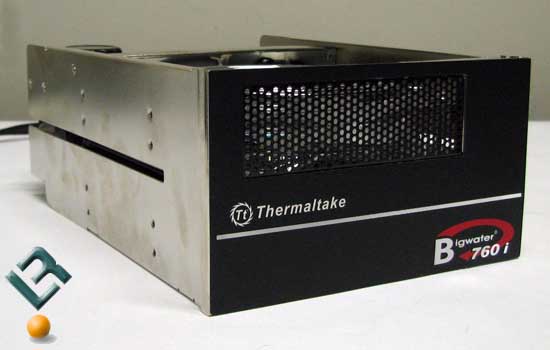
Thermaltake Bigwater 760i Water Cooler Review
The results and Conclusion
The results
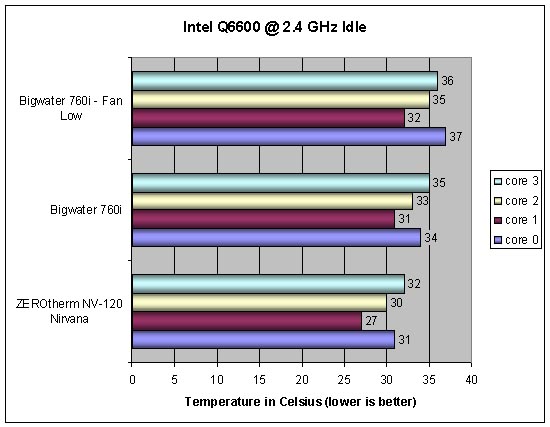
Now with the system up and running for a few days I started the testing. With the Q6600 at its stock settings Bigwater 760i did ok, but to be honest for a water cooler I was expecting more than “ok” temps. At idle the 760i was running 3 degrees warmer than the ZEROtherm NV-120 air cooler that is the price.
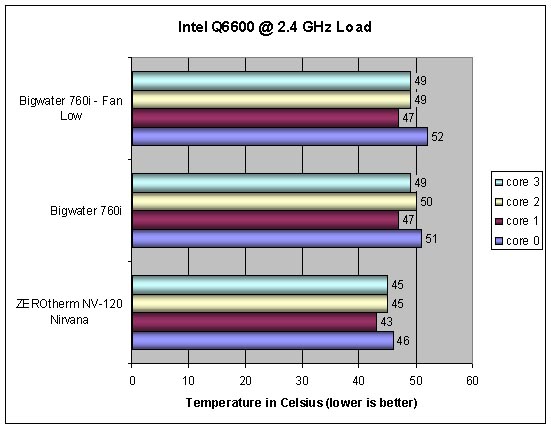
Moving on to the load temps at stock settings and more bad news for the Bigwater 760i. At full load the NV-120 was still ahead of the 760i, beating it by 5 degrees.
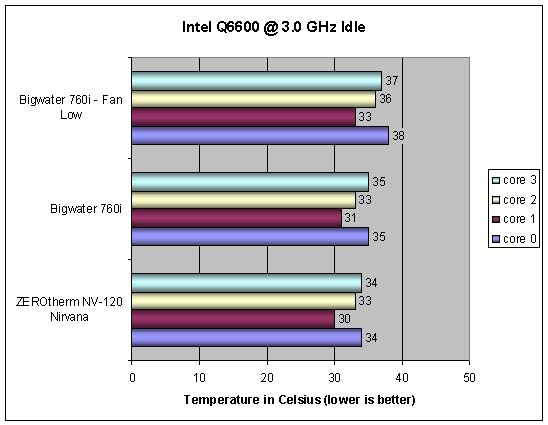
After the overclocking the Q6600 at idle the gap closed between the 760i and the NV-120, but the NV-120 was still winning by a degree.
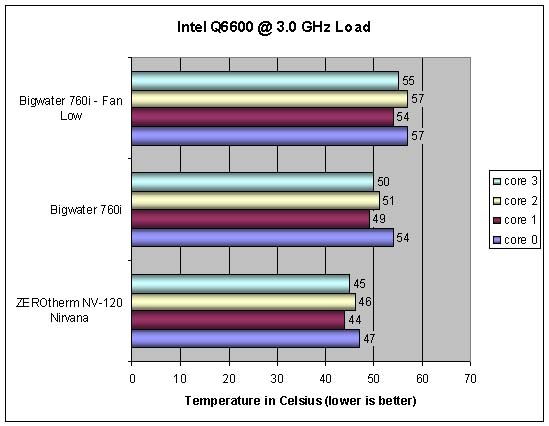
Under load, yet more bad news for the 760i: the load temps where above 50C. The temps were 6 degrees warmer than the NV-120, but still far far better than the stock Intel cooling.
Sitting back in my chair looking at the test bench and feeling rather disappointed I couldnt help but think about why the temps were so bad for a water cooler. I found my self looking at the front of 760i and the air inlet, in particular the way the inlet is in relation to the fan and radiator. I got to thinking that has to be restrictive. So I pulled the top of the M998 case back about 3 to simulate a blow hole. I then re-benchmarked the cooler.
And Im glad I did. The temps dropped drastically. At stock settings temps dropped 6 degrees at idle and a whopping 12 degrees under load. Making the faux blow hole resulted in 27c idle and 37c load temps. Now those are the numbers I was looking for from a water cooler! Overclocked we ended up with 27c idle and 42c load.
Conclusion
The Bigwater 760i is light on the wallet by water cooling world standards and it can be found for around $149.99 plus shipping. At this price there are a few kits out there at the same price point, like the external Corsair Nautilus 500. Unfortunately once you get past the entry level kits the price jumps in leaps and bounds as most of it is pieced together as some radiators alone can cost as much as the 760i kit. So this kit is good for a couple reasons: not only can it help ease the pain of moving to water by making it affordable, but it can also give you the modding bug by giving you a taste of what water can do.
For my first venture into water I learned a lot, and the main thing is that its not nearly as hard or complicated as I thought. That may be due to the kit, but either way the whole process was very easy. It took all of 30 minutes to do the pre-install and fill the system, the long part was the bleeding the air from the system and leak test. I chose to do this out of the case for the fact it was easier to fill the tank and work the bubbles out of the lines. That and the nagging thought of a leak.
As for the issues with the initial temps, I chose the M998 case for the test as Thermaltake states that the 760i is for mid to full tower cases. So I used the M998 as most users run a mid tower case. What the test shows is that yes, it can fit in a mid tower, but you will have to play with the arrangement in the case so the radiator gets a good source of air in order to be an effective cooler. If you are gathering parts for a new build I would look at a full tower over a mid. If you choose to go the mid tower route you are going to want a blow hole.
Bottom Line: If youre thinking of jumping to water and want a no-nonsense kit that can grow with you then take a look at the Bigwater 760i.
Comments are closed.