How to Install Vista on the ASUS P6T Deluxe with SAS RAID
Installing Windows Vista on the ASUS P6T Deluxe Motherboard with SAS Drives
Enthusiasts are always looking for the fastest thing they can get their hands on, especially when it comes to hard drives. Western Digital has had great success with their Raptor line over the years but inevitably someone is always looking for something bigger and faster. For some high reliability is the key, and when combined with outright speed you have an extremely attractive product. Today’s hard drive market is starting to grow towards enterprise level hardware, which is SAS. SAS, or Serial Attached SCSI, is the server grade storage medium of choice these days. Most new servers ship with SAS RAID cards capable of hot swapping 8 or more ultra fast hard drives via backplane. While this is a bit much for most consumers, we have our friends the enthusiasts. At a maximum speed of 15,000rpm SAS drives are no joke when it comes to access times, only SSD’s offer anything faster, and while prices are quite high, the extreme speed is extremely attractive.
In our review of the ASUS P6T Deluxe motherboard we noted that the motherboard was one of very few desktop boards to feature an on-board SAS controller. With this controller from Marvell, the board can just as easily function as an incredibly powerful and reliable workstation, or a monster gaming rig with ultra fast hard drives.
Since there are a few different speed grades when it comes to SAS hard drives we aren’t going to focus much on the speed of the drives, but simply how to get Windows Vista installed on a pair of drives in RAID 0 (stripe set).
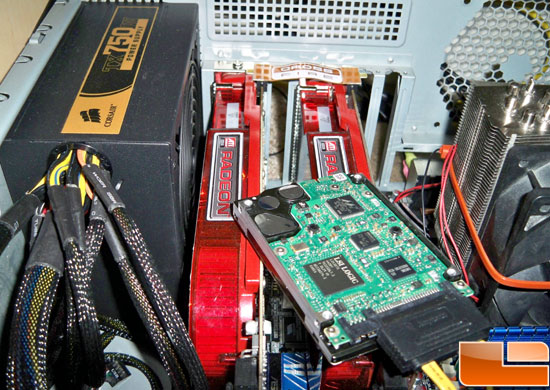
Before we start, you need to have the cables hooked up to your SAS drives of choice, as well as the molex power cables plugged in. Also, make sure you have the ASUS driver CD handy as you’ll need it as we try to set up Vista. Alternatively, you can copy the Marvell SAS driver to a USB key and once prompted you can load it from the USB drive. The driver is on the CD or it can be downloaded from the ASUS website.
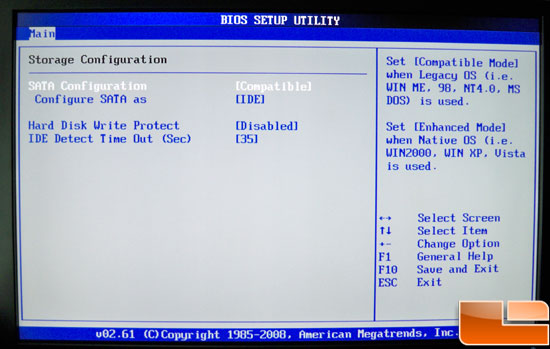
Our first step is to enter the BIOS and change a couple of things, you’ll need to enter the main BIOS screen and arrow down to “Storage Configuration.” In order to boot from the SAS Raid array you’ll need to set the SATA configuration as compatible. Once that is done you press Escape and go back to the main menu.
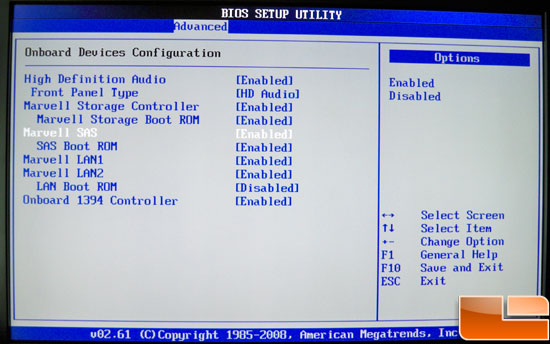
Arrow over to the Advanced tab and you’ll see “Onboard Devices Configuration.” Choose this and enable the Marvell SAS and SAS Boot ROM. If the boot ROM is not enabled the drives attached to the SAS controller cannot be used as a boot device. Once these two options are enabled you’ll need to press F10 to save and quit.
After the computer restarts, you’ll see the Marvell boot ROM appear during the boot sequence. Press Ctrl+M when prompted to enter the RAID configuration menu.
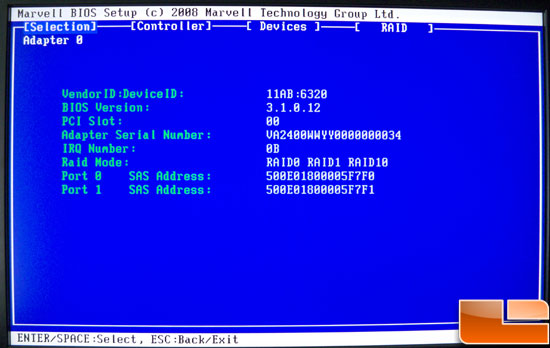
This is the main menu of the Marvell boot ROM, notice it gives you details about the device and drives. SAS uses an address system to communicate to the drives, much like your network card has a unique network IP or MAC address. You can explore a little here but moving the cursor all the way over to the “RAID” menu is where you’ll need to make the changes.
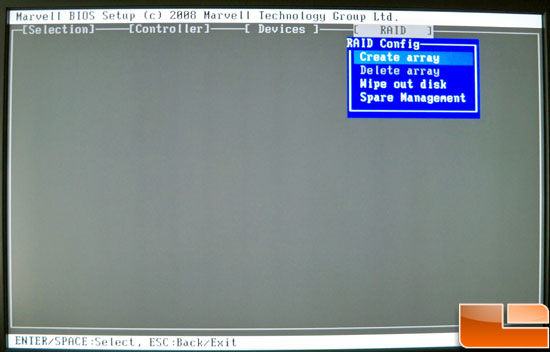
Here you’ll need to select “Create array.” This will lead you to a second screen where you’ll choose the drives you want to use. Of course since there are only two, you’ll press Enter next to each of them. An asterisk denotes a drive has been selected to be used in the RAID array.
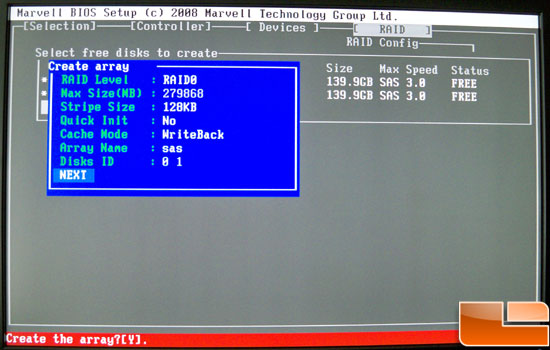
Once you’ve done that you’ll select the bottom option which will bring you to the screen you see above. Here you will choose the RAID level you want to create. Options are 0, 1, and 1+0. You can change the stripe size and size of the RAID partition, as well as enabling or disabling WriteBack mode. Disabled has lower performance but ensures that your data is not lost in the event the system loses power. I personally use Enabled and have not yet encountered any problems. Once you’ve got everything how you’d like it, arrow to NEXT and it will prompt you at the bottom if you want to create the array. Press Enter and the array will be created.

Once the RAID array is created it will take you back to the main menu of the boot ROM and you can see the details of the array. Press Escape to reboot the system, we’re almost done!
Comments are closed.