Building A Whitebox Notebook: Part 3
Introduction
In Part 1 and Part 2 of our three part notebook series we showed how to go about rounding up all the pieces for a custom notebook. Now that our notebook has been built, we can then turn it on and start installing all the needed software. I highly recommend leaving the keyboard “off” the system the first time you boot it. This will allow you to make sure the CPU heat sink fan is working properly. Not to mention if it fails to post you can make sure your memory has been inserted properly. Let’s stop the small talk and get to what you are here for!
Installing the Operating System
After you successfully boot up your notebook and everything seems to be working fine go ahead and install the keyboard. Now that the system has posted we can then install the operating system. While you can install a number of different operating systems on your system we will be covering the installation of Windows XP.
To install Windows XP by starting the computer from the Windows XP CD-ROM, insert the Windows XP CD-ROM into your CD-ROM or DVD-ROM drive, and then restart the computer. When you see the “Press any key to boot from CD” message, press any key to start the computer from the Windows XP CD-ROM. (Note If you want to start your computer from the Windows XP CD-ROM, your CD/DVD-ROM drive must be configured to do this. If you try booting the notebook and it won’t read the disk you may want to restart the notebook and enter the BIOS settings to be sure that you set the notebook to start from the CD-ROM/DVD-ROM drive. ) Once your notebook boots off the disk, you will come to a welcome screen. After hitting enter you will be prompted to read the End-User License Agreement, and then press F8. After this point you just need to follow the instructions on the screen to select and format a partition where you want to install Windows XP. After you select how you want to format your notebook drive you can relax and follow the instructions on the screen to complete the Windows XP Setup.
Once windows is installed we can then update the BIOS and start installing the drivers that ASUS included on their driver CD.
Updating the Bios
The BIOS’s found on notebooks are similar to that of desktop boards, but lack many of the options found on the desktop side. The majority of notebooks won’t even allow you to adjust any of the memory timings, let alone the Front Side Bus (FSB) or dividers. Since most companies are keeping the BIOS’s locked down so end users can’t adjust settings the only way to “tweak” the BIOS is to make sure you have the newest version available. I know many computer readers who do not feel comfortable updating their BIOS and if you don’t feel comfortable updating your BIOS I suggest you stop here and take it to a local shop and let them flash it. If you have been flashing BIOS’s on desktop boards and are comfortable doing it, then updating the BIOS on a laptop should be simple and painless.
The first thing to do when updating the BIOS is to go to the ASUS web page and see if you have the latest version of the BIOS (You can tell by looking at the BIOS date or the BIOS version number when the system posts). If the ASUS web page has a newer version, then go ahead and download/unzip the new BIOS on the notebook. If you have always installed BIOS updates via a floppy disk you might notice that the ASUS M6N series notebooks do not come with a floppy drive. Don’t fret because ASUS has a BIOS flash utility for Windows Operating Systems that allows you to update the BIOS from the Windows desktop.
|
|
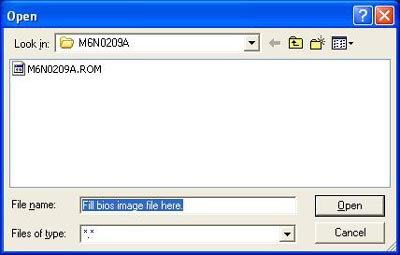
After you have unzipped the BIOS file you are left with a single .ROM file. Now all you have to do is run the ASUS BIOS flash utility, read the warning, and then just point the utility to the BIOS file (see above). The BIOS Flash Utility will run a quick check to make sure the BIOS is correct for your notebook and if it is it will go on to the flash screen shown below. Once here it will show you the current BIOS information and the new BIOS data before you update the BIOS. This is now the point of no return and the last chance to fully back out of updating the BIOS. To complete the BIOS update click on FLASH and let the utility run. In a matter of seconds it will erase the old ROM, flash the new one, and then verify the new ROM.
|
|
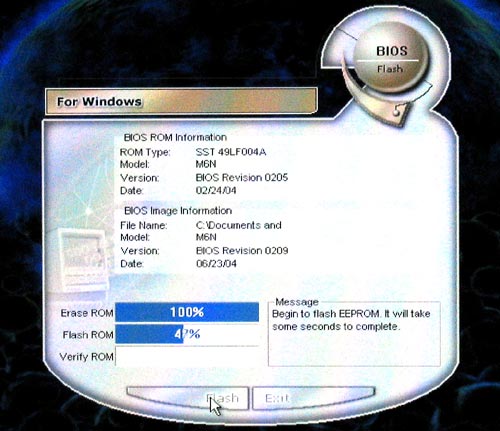
Once the BIOS has finished updating you may restart your system and if you did change any settings in the BIOS you should re-do your changes. When flashing the BIOS you delete the old one so none of the settings can be saved. Once you have made your adjustments, if any, we can go on to the next step.
Comments are closed.