GELID Solutions Darkforce PC Case Review
Interior
Interior
The interior is always where the core and heartbeat of the build will reside. If the design is right everything will comes together like a well choreographed Jackie Chan fight. The DARKFORCE may surprise long time builders with what is inside.
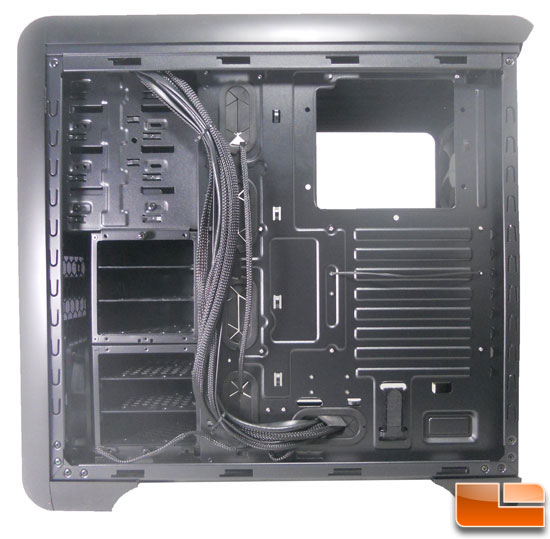
Here is an overall view of the DARKFORCE interior. From this view it looks quite roomy. A good view of the 6 drive caddies split between two cages is seen. The toolless optical drive cage shows a profile look. What is the first noticeable feature is there is a place behind the CPU cutout for a 120mm fan. Also, the intelligent cables are sheathed well while some are connected to the 2 built in 3pin power modules. This is power by one 4 pin molex connector. Also, a Velcro strap is in place for holding in the CPU. DiY also has an optional device that fits in a drive bay for fan speed control. Below we will see a closer look at how this all comes together.

Up front we have four 5.25″ drive bays. The fourth drive bay had a built in drive converter for 3.5″ device. The drive bays do not need tools due to a hinged screw device. This device is released with a quick push.
Now we have two HDD/SSD cages. Each cage has three caddies. The caddies for me were easiest to screw the hard drive in from the bottom, not the side. The drive caddies support not only 3.5″ drives but also 2.5″ SSDs. The caddies are well made from plastic. I didn’t have to worry about breaking one while installing a drive and sliding it into the cage. For those who use long cards, the cages are removable with a couple of thumb screws. This will work for cards up to 440mm (~17 1/4″)


Gelid Solutions absolutely put a little extra thought behind the motherboard tray. The motherboard standoff screws were already installed. Several extras also came in the accessory pack. There was a good amount of room from the tray to the top for the box for larger CPU coolers and liquid cooling. Perhaps the most noticeable item is what is on the interior of the secondary door. It’s a mount for an 80mm or 120mm case fan. This would sit directly behind the CPU cutout allowing for a nice cooling option. Also, notice between the tray and the cages are the rubber ports for wire management with the extended three pin power connectors next to it. This makes for some nice wire management options as well!

From the back of the case there is a lot to view. From the top we see the interior of the dust filter and also a fan mount. Along the back we see the three rubber ports headed to the back for liquid cooling options. A typical I/O panel cut out is next to the ports. A 120mm case fan is installed with a three pin power connector. Also, we see a look of the 8 + 1 expansion slots easily removed with thumb screws.

The bottom of the interior also has some noteworthy features. We can see the already wired fan power with a 4 pin Molex power source. The case wiring is also nicely tucked into the PSU Velcro strap. Yes, the power supply can be strapped in with Velcro!
The cleanable dust filer can also be easily removed. Two 120mm optional case fans can also be installed to the bottom for better air flow.


Finally we can see how great the preset wiring is. Even the Velcro loop can be seen on the bottom right of the case. I was really impressed with the cable management with this first Gelid Solutions mid-tower PC case.
Did I mention Swiss time pieces? The DARKFORCE may not be a time piece but precision was used in its making with the interior.
Comments are closed.