Case Labs MAGNUM M8 Case Review
By
Outside of the MAGNUM M8 Case
All of the Case Labs Magnum series cases come standard with either matte black or gloss white powder coat. The benefit of powder coating over normal paint is the durability. Powder coat is much harder to scratch than liquid coating since it is a melted polymer. The MAGNUM M8 height and depth is similar to a mid-tower case but it is the unique width of 15″ that opens up the possibilities for all the options.

The front of the case is split with the left side being slightly larger making the button panel offset from dead center. The left side is what is called the “Flex Bay” area and supports up to 10x 5.25″ devices. By default the MAGNUM M8 has two 3 bay panels and four single bay panels installed. However if you do order some of the Flex Bay options they will be pre-installed at the factory replacing the blank panels. We will cover this in more detail on the options page. The right side has a single 120mm fan port and plates covering two more 120mm ports. The center by default has a power and reset button that glow blue and red, respectively when the power is on or there is drive activity. These are standard black Lamptron momentary vandal switches at 22mm top and 16mm bottom so you can replace them with other colors if you choose.
Unfortunately if you want the more common front I/O ports you find on other cases today it is a $20.00 option. That option adds a firewire port, headphone & mic audio ports, and 4x USB 2.0 ports below the power and rest buttons. Note that USB 3.0 ports are being investigated with their parts vendors.

Our sample came with an upgraded left (MB side) side with the XL window upgrade in Clear, a $20.00 option. There are several other options we will cover on the options page.

The back of the case reveals more options on the Case Labs MAGNUM M8. Starting from the left there is the option for dual power supplies if redundancy is important or you simply put that much cooling, lighting, hard drives, or graphics cards in the case requiring more than what a single PSU can handle. We are not sure how often this would be required but nice if you ever needed it. This also gives you the option to move the PSU higher up or lower down depending on how you want to run cables or install options. Also note the reversible screw patterns allowing you to mount your PSU bottom facing out or top facing out.

The motherboard tray is removable by simply undoing these spring screws. Case Labs includes a robust handle with mounting screws you can mount to the tray to make sliding it in and out easier or leave it off for a clean look.

If you simply cannot fit all your water cooling components inside this massive case, Case Labs provides four ports covered with a plastic plug out of the back of the case. If you do decide to use these ports Case Labs provides rubber grommets to insert in these holes to protect whatever is passing through them.

The right panel comes standard with a dual horizontal striped ventilated door. If you mount one or two PSU’s with top mounted fans, they would pull in air through one of these vents. This side has the same options as the left side. We wish there was some type of filter on these ports considering they will be used for intake but being side mounted should help reduce the dust levels somewhat.

The bottom of the case reveals six more 120mm ports covered by panels that are spaced for 360mm radiators. and four threaded holes in each corner we will cover on the options page.

On top of the case are two more ventilated panels with plates below them covering the top ports for fans or additional 360mm radiators.

Front panel off reveals the thumb screws for the Flex Bay ports on the left, the mounting screws for the switch panel and the three 120mm holes for optional fans.

The top cover off shows the plates covering the mounting spaces for fans or radiators up to 360mm. While most radiators have standardized on 15mm spacing the slotted screw holes allows for different spacing if needed.
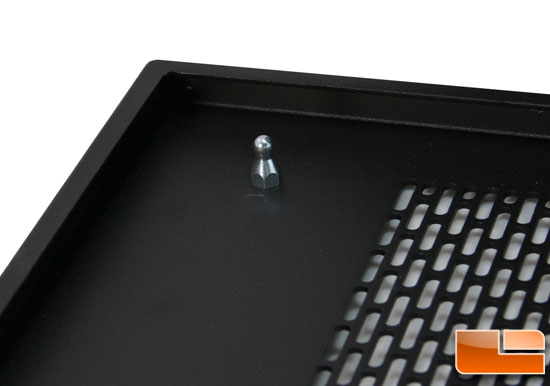
Pin

Attachment Point
The front and top panels just pop off and on with the pictured aluminum pins that snap into attachment points at the four corners. No plastic pegs to snap or screws to undo. This makes for a totally stealth appearance that has the durability to be removed many, many times over the life of the case.
Comments are closed.