ASUS Z63A Whitebook Laptop Review
Assembly
Until I read the previous articles on Legit Reviews, I didn’t even know it was possible to build your own notebook. Fortified by those articles and discussions in the Legit Forums, I felt confident enough to dive right in. In summary, it was no big deal. Compared to the all-day flog involved in configuring and wiring a desktop, building your own notebook is a 45-minute piece of cake. There’s a short list of things to install, a pre-designed place to put them, and everything’s engineered so they will fit (and work). You literally could do it in the front seat of your car.
CPU and RAM module #2
|
|
|
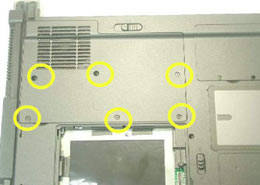
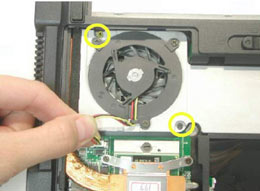
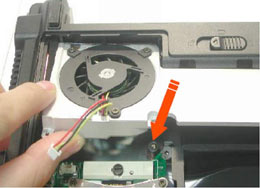
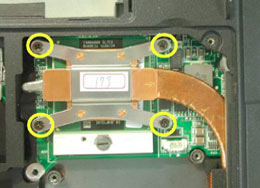
Remove the six screws shown above and take off the cover . Remove the two screws holding down the processor fan, unplug the fan connector, and take off the fan module. Remove the 4 screws that hold down the heat-pipe, and move it out of the way.
|
|
|
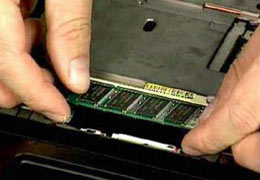
Plunk the CPU into the zif-socket, and turn the locking screw clockwise to lock the processor into the socket. While you’re in there, put in the 2nd SODIMM module (if you’re using two memory modules) at a 45-degree angle, and then snap it down into the latches.
|
|
|
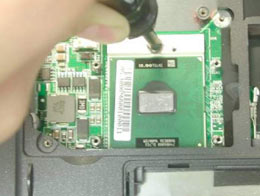
Put the heat-pipe back on (use some Thermal Paste on the CPU and northbridge instead of the pads), slip on the fan module (remember the fan connector), and replace the cover. Now we are done installing the processor and one memory module.
RAM module #1
|
|
|
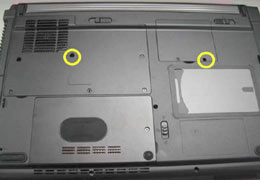
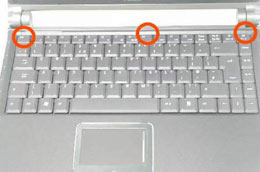
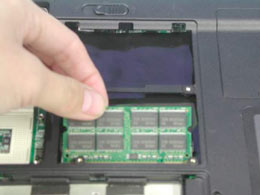
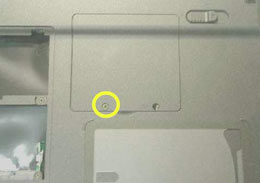
Remove these two screws shown in the above left image and then flip the ASUS Z63A over as the #1 memory module is under the keyboard. Unlock the four latches (manual says 3) at the top of the keyboard (use a small screwdriver and push toward the screen). Lift up the screen edge and pull the keyboard toward the screen, then rotate it out of the way. You don’t need to disconnect the ribbon cable. Move the memory cover to the left to remove it. Install the #1 SODIMM at a 45-degree angle and press down until it clicks into the latches.
|
|
|

Replace the memory cover and keyboard (press down with the screwdriver along the screen edge to make sure the little latches are locked). Replace the left-hand screw on the back.
Wireless Card
|
|
|
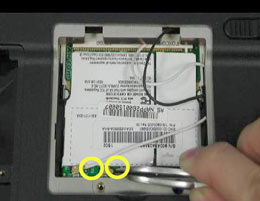
Remove 1 screw and the wireless cover. Connect the 2 antenna cables before you insert the card (just press together with your fingers). Insert the WLAN card at a 30-degree angle, then snap down to engage the latches just like the ram modules. Replace both screws.
Optical drive
|
|
Slide the optical drive into the drive bay until it locks into place.
Hard Drive
|
|
|
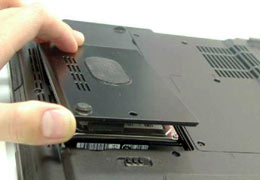
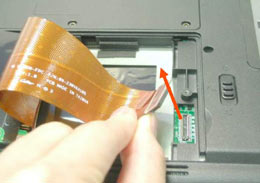
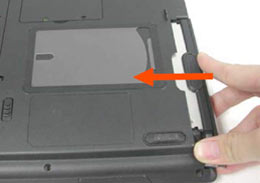
Remove 1 screw and the hard drive cover. Install the ribbon cable, and set the hard drive in the case. Place the heat-resistant film barrier on top of the drive. Replace the cover and screw. Or just have a drink and a smoke, I don’t care �
There you have it ? it really is that easy. If you’ve ever changed a hard drive in a desktop, it’s about that complex a task. If you’ve never-ever seen the inside of a computer at all, you can still approach the task if you’re reasonably patient and have enough brain power to heat up your hair gel. Actually, the hardest part of the entire job is not dropping the tiny screws. You can use an old mechanic’s trick: wrap an insulated wire around and around the shaft of your best small screwdriver, then momentarily touch one end of the wire to the positive post of your car battery and one end to the negative. Zap! – Instant magnetic screwdriver.
Comments are closed.